By Robert Beech
Chapter 3 - January 2003
<< Click Here To See Pictures Of Bob's S8 Restoration >>
All that effort to get all the bits around me for the Xmas gearbox rebuild was a bit of a disaster to start off. I put in the new cups, oils seals the works, but once the cover plate went on, the whole box locked up solid. At first I thought I hadn’t driven the shafts far enough into the cups, the bearings are quite a tight fit into new cups. So the shafts got another good knock into place, listening for the solid ring that said they were home which I got with the first knock as they were already firmly seated. Still I gave then another good blow for luck, put the cover plate back on, and it locked solid again. At this point a bit of brut force came into action, I knocked seven shades out of the main shaft trying to get it to seat further back, and free up, it did not work. Then I thought I know what I have done I have put the cups transposed in the wrong places, the main slightly deeper than the lay cup. So out came all the internals again to find that they were the right way round anyway.
Time to sleep on this I though, the following day I decided to take the cups out and measure them all old and new. Lay shaft cups were identical, but the main shaft cup was about 60 thou shallower than the old original. The air went blue poor old Stewarts came in for all my frustration, and E-mail was sent detailing my findings.
Dave Holyoake rang me back on the 2nd of Jan full of apologies, which was not really necessary because he had done the best he could with the data available. He was once asked for a pair of cups, but it was not a part that had been request before. So he measured all the old cups he had in his spares to find they are all different depths and decided to make ten sets on nominal dimension. He was concerned that they may not be quite right and that at some point someone may have a problem. After selling nine sets without any complaint confidence grew, then he sold me the tenth set. I was the one in ten.
After taking about it we both came to the same conclusion that there must have been a range of sizes available to the original assembler, who selected the correct one to match the box, virtually hand fitting due to the poorer machining tolerances 50 years ago. He did offer to re-machine it for me, but it was quicker for me to drop it in the die shop at work, they took an initial 30 thou of the back face of the flange to see how it went. The gearbox flew together as sweet as a nut.
The moral to this is. Mine was a complete gearbox and I hit problems. If you are assembling a gearbox from various sources, I would fit each shaft independently to make sure that it rotates freely and that there is not an excess of end float with the cover plate bolted up. Setting each one up properly before you fit them as a pair with all the other bits and pieces.
The other thing that puzzles me here is the bedside book is a bit contradictory over this issue. First it says that the bearings should be a tight fit in their end cups. Then it says if there is end float, then up to one eighth is permissible. The statements can’t both be right, either they are tight with no end float or end float is permissible to a tolerance. I think if I tackled another box and the bearings were a slip fit, as mine were. I would just shim out the end float not fit new cups, perhaps adding some Loctite bearing fit in the process.
The distributor was also an item for refurbish over Christmas, I must say I was a little scared of doing this myself. I had the digital camera on the go all the time, photographing each stage of dismantling so I had a clear record of where every thing went. I needn’t of worried it is pretty straight forward, the only help I really needed was Stewarts to machine and re-pin the bob weights.
Having completed all this the only thing left was to mate engine and gearbox together. A simple task but again I hit problems, I originally didn’t have a full set of clutch springs so I got some made at a specialist who makes springs for us at work. God knows what foot poundage they were made too I could not move the clutch it was solid. Stewarts came to the rescue again with a new set and finally a complete engine and gearbox unit.
Saturday 1st of February the whole lump went into the frame. Looks good but there are still quite a few pennies left to spend to completion
February 2003
Since Saturday the 1st, I have done very little to the bike itself. Mainly spent my time job hunting / trying to get the cash to finish it off.
Luckily during Feb a couple of the important bits that were missing have come my way.
An as new speedometer for £80, It’s an 80mph one unfortunately but it was too good a buy to miss, so I will look for a swap later.
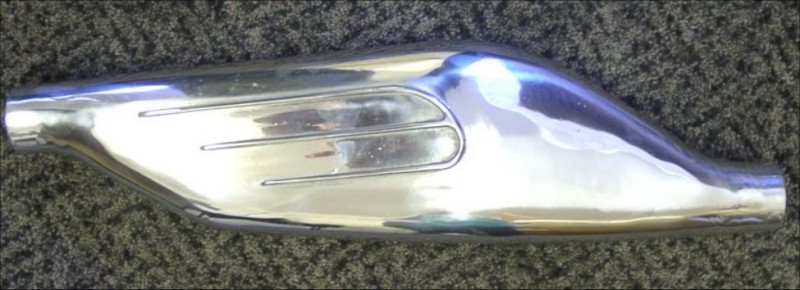
I also came across two aluminium silencers; one the guy wanted £200 for his which was perfect complete with tail pipe and baffles but to expensive for me. The second one had been repaired on the two pinch bolt bosses and needed a little machining, but for £70 I thought it was worth giving that a go. It has clean and machined up superb.
My search for a metal toolbox has ended, and I have come to the conclusion that it I will have to buy a glass one from Stewarts.
Past these three items everything I need, I want new anyway... that is:-
Concentric carb, filter, and cables, twist grip,
Speedo and clutch cable,
Full electrics: Harness, CVC, Coil, Ammeter, Headlamp Assembly,
Kick Start, Tail pipe, baffles, and flex for the exhaust,
Various nut bolts clamps and rubbers and fittings.
About £400’s worth to complete
Suppose I should just dig deep and finish it off
<< Click Here To See Pictures Of Bob's S8 Restoration >>
See Chapter 4 - The End of the 'Beambow